My Corner Online
These layout suggestion and layout re-do's were done as a part of Course 1, Lesson 8A, on Visual Weight. I invite you to be brave and participate by senidng me a layout. It is how I learned to grow in skills, with others giving me suggestions.
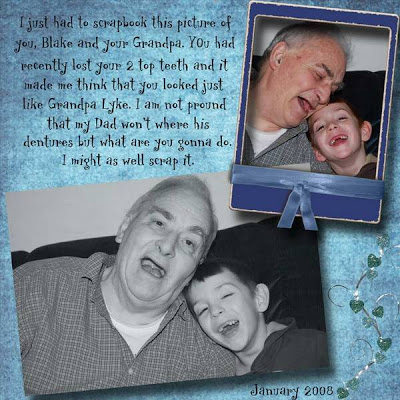
Awesome journaling! It makes everyone who reads it smile! I see one type in "proud."
I think it is a pretty sound layout and could remain as it is.
However, here are some things I note. Remember, these are just suggestions, but there are no right or wrong answers. So try some or all of them. If you don't like it, put it back the way it was. That is why this program makes us artistic! We can play with things until they look just right.
1. I like the black and white photo with the supporting color photo. However, if you wanted to make the black and white photo pop off the page more, you could convert it using the Course 2 gradient map technique.
2. The drop shadows seem too high to me. However, the do not seem wrong either. Being as high as they are lends to an effect that they are higher than the journaling and almost as if you have given them a custom drop shadow to make the bottom of the photos pop off the page as if they are flatter to the page at the top and off the page at the bottom. Realistically as to paper scrapbooking, they would not be so high. You might want the shadow of the one in the frame and on top of the other one to be just a little bit higher than the other one.
3. The text seems just a little too large for me. Remember that it has to be readable as you print it out, not as people would need to read it in the gallery. I found that when I make my text bigger when people complained they could not read it when I was sharing it online, it seemed too big when I printed it out. I realize that you made the text larger probably to fill the spot so there was balance. However, remember that white space can also be a good thing. White space serves purposes, mostly to push the eye down towards the photos. Your layout has very little white space.
4. Title. A title would top off this layout. It would also give the reader something to smile about and make them want to continue . I like to use words right out of my own journaling for a title. I often do this. Just read through your own journaling and look for a small set of words that encompasses the main point of the layout. In your layout I see the words "Just like Grandpa Lyke." What I am seeing here is an opportunity to utilize the text right in your journaling as the title and to create a simple artistic flair to the layout. Separate your journaling (since it could be smaller anyway) into three layers. Put the words before "Just Like Grandpa Lyke" on one layer, the words on their own layer, and the words after on its own layer. Change the font, color, size, etc...whatever works...on the words "Just Like Grandpa Lyke" to make it more like a title. Now, rearrange the other two sets of text so that they flow in the ...so that the reader begins ...continues with the title..and then continues . Keeping the title in all lower case will help with its flow. I really do like simple layouts and doing something simple like this will give your layout just enough of something special without taking away from its simplisticness. It also gives you an opportunity to make the journaling a tad smaller.
5. Grounding. You are grounded okay. Grounding is where everything in the layout touches something that touches the edge. It could only be only one thing on the edge and everything else touches that one thing. Your photos themselves (frame) nearly touch the edge. The little doodle is actually placed well as it touches the edge and then it touches the frame...it serves to ground. I bet you did not realize that was what it was doing!
6. Focal point. The focal point is currently on the photos and if you get nothing else right, this and the journaling is the bottom line of all that matters.....kudos to you!
7. Bottom weighted is better -- yep, your layout is bottom weighted! Kudso!
8. The design principle of contrast. I have a bit of a trouble the black text on top of the darker part of the background where the text begins. I like the black text as it is not grabbing any focal weight. Just adding a piece of vellum (a white mat with a lower opacity) under the text is often all that is needed to increase the contrast just enough to make it more readable without increasing the focal weight. When lowering the opacity to the vellum, watch for these things...observing when the white mat grabs focal weight (the eye goes to it first) and then as you reduce the opacity it moves from the focal weight and yet still helps to make the contrast between the text and it so the text is more readable.
9. Remember that what touches the edges is sometimes cut off in printing. Touching the edges serves as grounding, which is good, but if you choose to move them away from the edges, you have to use mats that do touch the edges to ground the layout again. It doesn't matter if mats get cut off when printing. Also remember that having space between the edges and the photos gives them "white space" which is helpful. Not anything you really need to do here as your layout is okay, just some thoughts I am throwing out there for you. You will often find that when you go for fixing one thing, it causes you to add or move other things to make it work again.
10. There are always more than one way to achieve an artistic principle. Rather than the vellum mat (which is always a first easy attempt for beginners to fix the problem), you could make your text white and then change the blending mode to the text. This is actually very effective when your text is on paper such as yours where it is darker in one area and lighter in another. The actually blending of the text into the background adjusts the differences.
Well, those are my thoughts! Take or leave any of them. If you do a redo, please do upload it to share so we can all learn from what you decided to do with the layout.
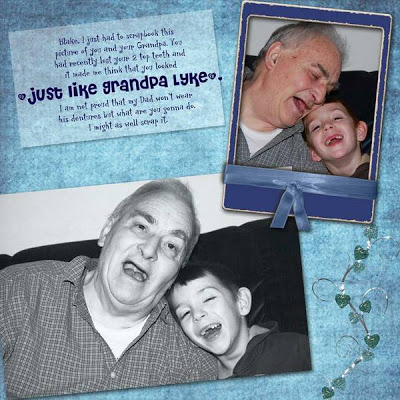
The above is her redo and here are my additional suggestions below.
Oh, wow....does that black and white photo look better or what!
I like it better. Don't you?
As I do with my own layouts, when I change one thing, it seems I always see something else that needs changing because of the first thing I changed.
Now that the black and white is much brighter, it makes the color photo look dull. May I suggest that you check the levels on that photo now? With the photo layer as the active layer, Click Control L to bring up the levels box. On the top portion where you see the graph, move the RIGHT slider to the left until it reaches the point where the mountain on the graph begins to rise.
You can see more about exposures and levels in the Course 2 tutorial. Wow...you learned about the gradient map today and now this! See, taking me up on layout suggestions is a great way to learn new things. It's how I learned...really.
Just two more small corrections I see. First, the title portion of the text goes off the mat just slightly (it always takes someone else to see this, even in my layouts!)
Second, lower the text and vellum mat so it is closer to the photos. Having the "white space" in the middle of the layout is always awkward. You see the "white space" between the photo and the text. Having the "white space" at the top actually words to push the eye down to the text and photos and, in addition, keeps the layout bottom heavy.
In addition, study how your eye flows about a page. It usually sees one thing first and then travels about the layout. Having white space out in the middle usually confuses the eye and it does not flow around the page well.
Don't be afraid to allow the vellum box to go behind the frame or photo (or both) as it creates depth.
If you would do another redo...I would love to share this on my blog with your permission so others can see what this area is all about.
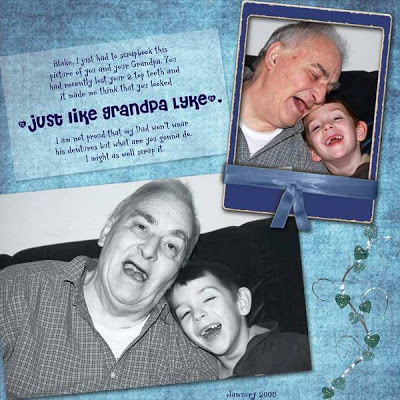
Here is her final layout! Small changes with a big difference, huh!