My Corner Online
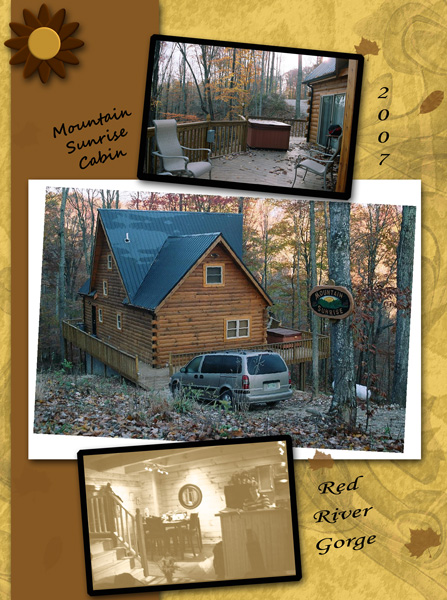
These layout suggestion and layout re-do's were done as a part of Course 1, Lesson 8A, on Visual Weight. I invite you to be brave and participate by senidng me a layout. It is how I learned to grow in skills, with others giving me suggestions.
1. contrast - you did well with the contrast on the photos. The middle photo is dark, so you used a light mat. The bottom photo is light, so you used a dark mat. My eye is missing the mat on the top photo though...it would also need a dark mat. Alternating dark and light down the page is a good thing!
2. size - the photos are large enough and you have one focal photo and two supporting photos which works well.
3. color - color is pleasing to the eye and works well with the wood of the house and with the fall theme.
4. shape - Not applicable here.
5. texture - The texture of the background paper is nice, but it is actually a bit too much of a good thing. In the next tutorial on using patterned papers, you will see a main principle of just simpling using the patterns in smaller amounts. By adding a vertical mat to the left side of the layout (see 8 balance below) you will be limiting the patterned paper just right.
6. isolation - plenty of white space
7. value - Not applicable
8. balance - Overall, the layout is fairly balanced. I do have a few suggestions though. First, the layout is not grounded. You do have the bottom photo touching the edge at the bottom, but then nothing is touching it. Therefore, the top two photos are just floating on the page.
I would suggest adding a vertical solid color mat to the left side of the layout touching the top and bottom and covering one-third of the layout (rule of thirds). This would ground everything is a simple way.
I like how you turned the mat on the middle photo. Do not be afraid to turn things as you did with this mat and do not be afraid to have things slightly on top of each other. It helps to ground them. Since your largest photo is in the middle, the layout is not really bottom heavy. I would suggest moving the bottom photo up and tilting it so that it every so slightly is on top of the middle photo and then lowering both of them just slightly on the page. Then move the top photo down so it is slightly on the big photo. This will leave "white space" at the top of the layout and make it bottom weighted which is more pleasing to the eye.
You are much like I am. I had to learn also that everything does not have to be perfectly lined up and make myself get out of "my box." I see you lined up the text so it reached the top and bottom of the photos. Remember that every space does not have to be filled as "white space" also works as a "something." I would suggest making your text two-thirds the size of the photos (rule of thirds) and tucking it into
the corners.
In addition, I am seeing no drop shadows. Add a soft drop shadow to the papers and the mats and the flower, but not the text.