Additional Course 1 Videos
Bounding Box

If you cannot click on an element or something on your desktop to activate a layer, turn on "auto select layer." If you cannot see your bounding box, turn on "show bounding box." To do so, activate the move tool and look in the "tool options." The "tool options" are at the bottom of the page in later versions of PSE and at the top of the page in earlier versions of PSE (before PSE 10).
Preferences
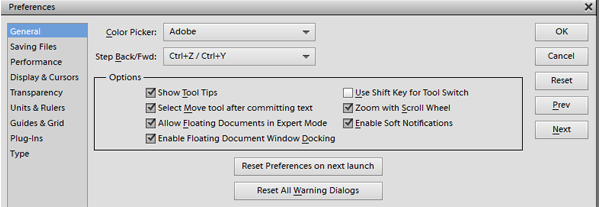
There are two important setting for my personal use which I recommend. Click on the edit drop down box to find the preferences. Here is a screen shot of my preferences in PSE 11.
First, "enable floating documents window docking." This will allow you to dock and undock your windows. To dock (or park like a boat securely to the edge) a window, drag it up to the edge of the desktop until you see the green or blue highlight around the box appear and then let loose of the mouse button. To undock (untie it from the edge so it can float or be placed anywhere on the desktop), just drag it down away from the edge.
Second, I am a mouse user and I prefer to zoom with my scroll wheel, so be sure that box is checked.
Using Tabs
Photoshop Elements 8 introduced tabs. They are in 8 and above. Tabs are awesome! They eliminate the need to utilize the "tile" to bring photos into your layout.
If you are having difficulty zooming in PSE8, it may be because you do not understand how the tabs work.
Here is a video to help you.
Drop Shadow Basics
When I first wrote the tutorial for PSE, the drop shadow settings were limited. This is something that I've needed to share for a long time and here it is!
The video is about 30 minutes long, so give yourself time to watch it.
I do mention several things in this tutorial, but I think having it in the written format will make it clearer and, therefore:
Factors to consider when setting the distance and size are:
1) The angle of the light source. For instance, if the angle is straight up above, then the distance would be nearly non-existant.
2) The height of the light source.
3) The height of the object itself.
4) The height that the object is off of the page.
5) The harshness of the light source.
The new adjustment layers in Photoshop Elements 8 received a big change with regard to the hue/saturation. The below video shares the differences, so if it looks different than some of the videos here at My Corner Online, this may be why. You might learn something about changing colors in this lesson too!
What's new in Photoshop Elements 11
Photoshop Elements 11 has changed its interface greatly, but everything is still there. You CAN follow tutorials with previous versions, but one must just translate the location of the tools into their own program.
Once you learn where the tools are located, your mind will translate the location quickly without thinking.
Here is the first five on the new interface.
This video shares all that is new in Photoshop Elements 11 so you can decide whether or not to upgrade by what you would or would not use.
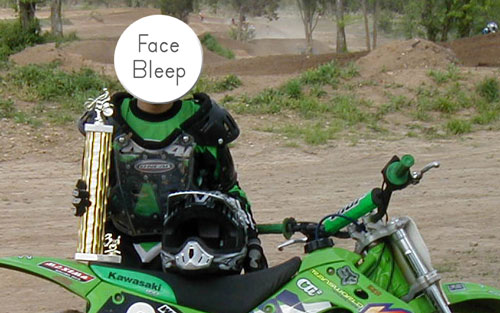
FACE BLEEPS
You can never be too careful with internet safety. I want everyone to feel comfortable with uploading your layouts to the gallery.
Generally, I do put photos of me, hubby and my three boys online, but I always put a "Face Bleep" of any other family member on the layouts before a do a "Save for Web" for gallery purposes.
Most often for regular scrappers on the internet, the sharing of layouts is harmless. I think that the more known you are on the internet, the risk is greater (like for me). It is a choice you need to make for yourself as to what you are comfortable with sharing.
Although a circle with some text on it is easy to make, having a handy .png file to drag into your layout is convenient, so I am providing you with a download.
Download